From previous blogs, you must have known about photography and its various types. Now, let's talk practically about it. Normally, you capture photographs by just clicking the shutter release button and that's it. But sometimes the results you get is not as your expectations. For instance, some shots becomes over-exposed or under-exposed. Some even gets blur while shooting at night. This all happens because the camera is not in your control. It is working automatically. All you are doing is just capturing the shots.


It is always better that you control your camera to get the desired results. This is done by "Manual Mode". Though there are many different modes in a camera but if you master the manual mode, you won't need to use any of the mode.

Dial Mode of Camera
Above you can see a dial showing different modes of a camera. These modes are night, food, sports, close-ups, landscapes, portraits, flash-off and auto. All these modes are fully automatic and their names clearly tells when to use which one. But, the result you get after shooting in any of these modes may not be the same as you wished it to be. So here comes the use of manual mode.
Understanding the Manual Mode:
Basically, the manual mode allows you to control the amount of light to capture a shot. It gives you total control over the camera.

Screen of Camera while using Manual Mode
There are three different factors, which are responsible to control the light in a photograph. These are Shutter Speed, Aperture Value and ISO. If you look at the above image, you'll see the some values on the first line. 1/125 indicates shutter speed, F2.5 indicates aperture value and 400 indicates ISO.
Now, let's understand these terms:
- Shutter Speed: While capturing a photograph, you must have heard the sound of "click". Actually, that's the sound of opening and closing of shutter. There is a shutter in front of camera sensor which when opens, allows the light to enter through it. So, shutter speed indicates how fast or slow the speed of opening & closing of the shutter is. In simpler words, it controls the exposure time Faster the shutter speed, lower the exposure (light). Whereas, slower the shutter speed, more the exposure (light). So while shooting in daylight, a faster shutter speed is required while a slower shutter speed is required to shoot at night.
Also, when shutter speed is slow, the image will be blurred (motion blur). This happens because one can't keep his/her hand steady for longer time period. That's why, a tripod is always recommended while shooting at slower shutter speed. Whereas, if you want to capture an object in motion in a static condition (freeze the moving object), you must use faster shutter speed.
Note:- Fast shutter speed is above the value of 1/250th of second, whereas a long shutter opening time such as 1 second or beyond is known as slow shutter speed.
Shutter speed is measured in fraction of second when under a second.
For example:- 1/15, 1/30, 1/60, 1/125 etc.
The shortest shutter speed available in most cameras are 1/4000 or 1/8000, whereas the longest shutter speed is 30 seconds. Although, one can also choose the desired amount of time for which the shutter remains open. This is called "Bulb Mode". But, an external trigger is required for bulb mode because a long shutter speed can bring in motion blur even if you slightly touch the camera.

Shutter Speed Chart
- Aperture Value: Aperture is a small opening inside the lens of the camera which allows the light to pass through it. It is indicated by "f". Greater the f number, smaller the size of aperture which means less light will enter and more the area will be in focus, whereas smaller the f number, bigger the size of aperture which means more light will enter and less area will be in focus. While shooting landscapes, larger aperture value is used (more area in focus) and while shooting portraits, small aperture value is recommended (only face/body in focus).
Apart from this, aperture also controls depth of field. That's what results in more/less area in focus. Let me tell you what is depth of field. It is the amount of area in a photograph which is in focus ahead & behind the subject.
- Deep Depth of Field - When the focused area is large.
- Shallow Depth of Field - When the focused area is small.
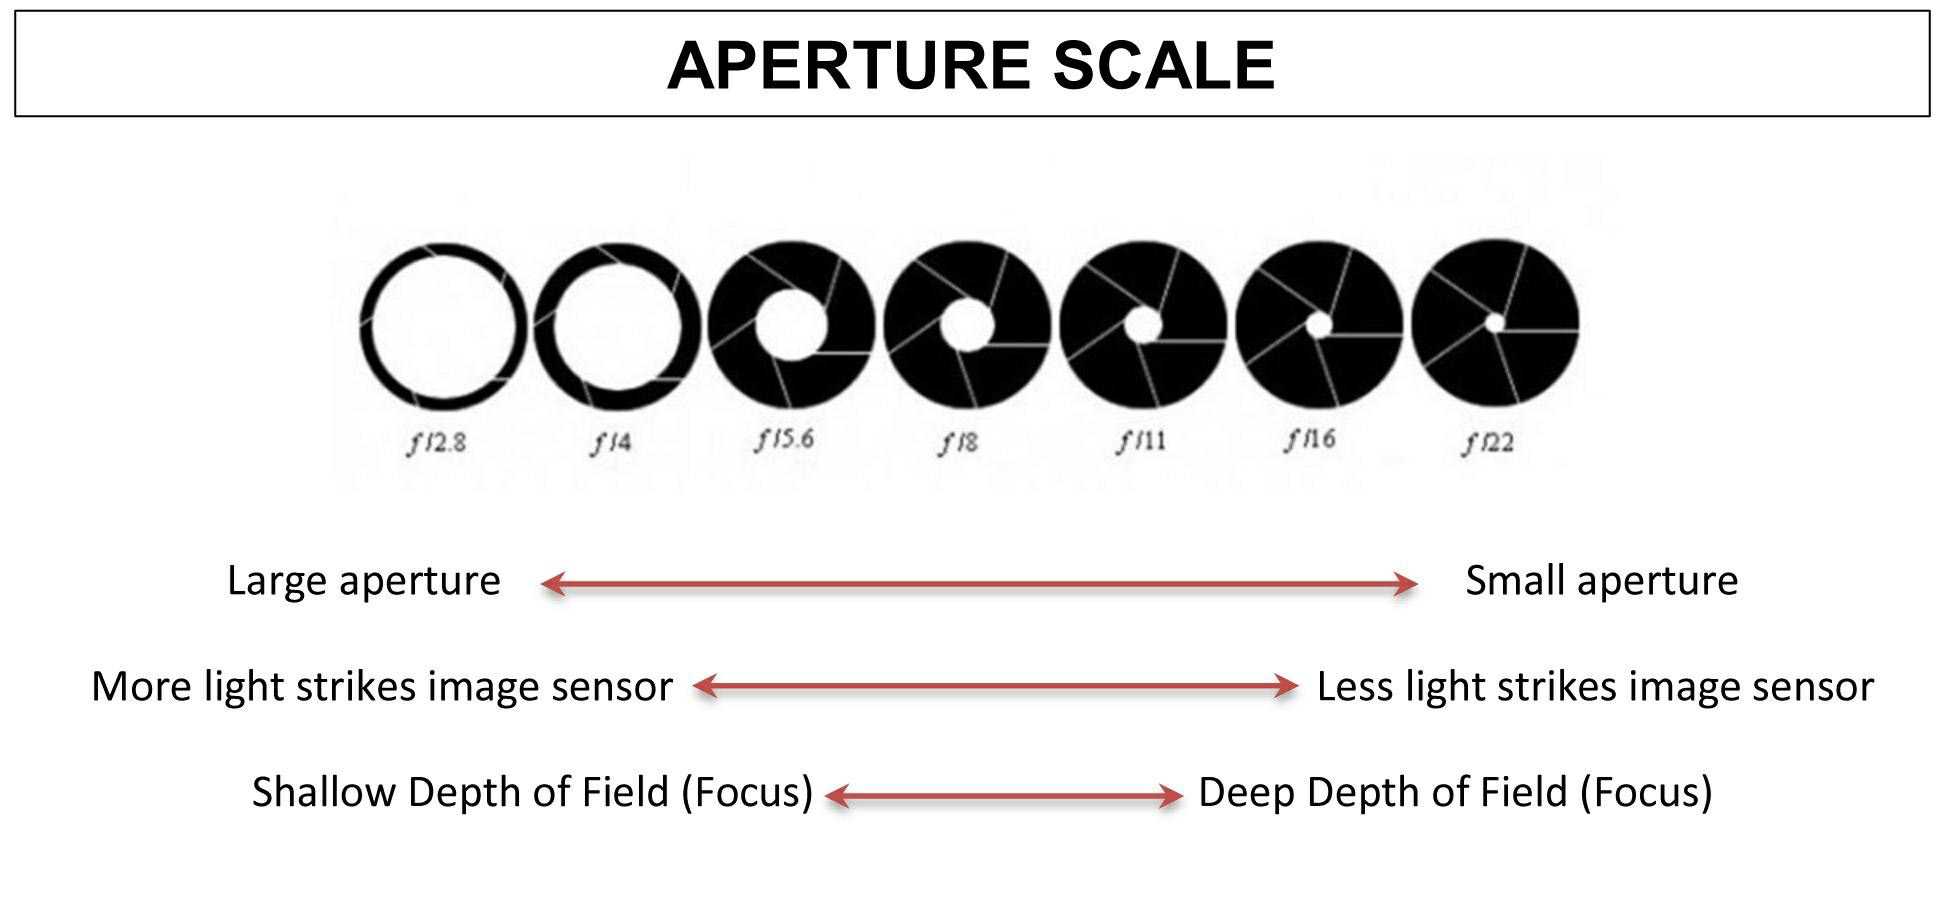
Aperture Value Chart
- ISO: It stands for International Organisation for Standardization. But this full form is not related to photography at all. It is just a standard name given to it. Actually, there were two film standards during early days called ASA and DIN which later combined together to form ISO in 1974 for both film and digital photography.
ISO basically defines the sensitivity of the sensor towards light. Higher the value of ISO, more the sensor will be sensitive towards the light and hence will result in brighter picture. But it is always advised to shoot in lower ISO value because with the increase of ISO, the image will introduce grains (noise) in it. Though, you can denoise your image while doing editing by using software like Lightroom and Photoshop. But when possible, try to shoot in natural light and change the shutter speed to get more light if needed. Although, while doing astro photography (while shooting stars), you can increase ISO value.
Let me tell you in which condition you should use which ISO value so that it will help you to practice as a beginner.
- Use 100-200 ISO while shooting in daylight
- Use 200-400 ISO while shooting in shades/indoors
- Use 400-800 ISO while shooting in flash indoors
- Use 800-1600 ISO while shooting in darker indoors/night
- Use 1600-3200 ISO while shooting indoors at night
- Use 3200+ ISO while shooting in extra low light

ISO Value Chart
All these 3 factors together makes "exposure triangle". If you will master the exposure triangle, you will be able to control the light of your photograph accordingly. Nowadays, mobile phones are also providing the feature of manual mode/pro mode.
Cameras are also providing the semi-manual/semi-auto modes for shooting. These are called Shutter Priority Mode & Aperture Priority Mode. The shutter priority mode will allow you to change the shutter speed while aperture and ISO will be set automatically by the camera, whereas aperture priority mode will allow you to change the aperture value and will set the shutter speed and ISO automatically. These modes are helpful while shooting in such conditions where you can't control the complete exposure triangle. For example:- While shooting an event of a wedding. The lighting conditions of the locations can differ from area to area and you can't miss to shoot the moments with correct exposure. In this condition, you can use the semi-auto modes to get some great pictures.
So I hope you all must have learnt about the basics of camera and you must have understood the importance and use of exposure triangle in a camera. If you have any doubts regarding the manual mode, let me know in the comment section or you can DM me on Instagram on @manusharma.ig.
Will meet in the next blog!
Keep shooting :)
🌟🌟
ReplyDelete